Docker 개요
Docker는 애플리케이션을 개발, 적재 및 실행하기 위한 개방형 플랫폼입니다. Docker를 사용하면 애플리케이션을 인프라에서 분리할 수 있으므로 소프트웨어를 빠르게 제공할 수 있습니다. Docker를 사용하면 애플리케이션을 관리하는 것과 동일한 방식으로 인프라를 관리할 수 있습니다. 코드를 신속하게 적재, 테스트 및 배포하기 위한 Docker 방법론을 활용하면 코드 작성과 프로덕션 환경에서 실행 사이의 지연을 크게 줄일 수 있습니다.
The Docker 플랫폼
Docker는 컨테이너라고 하는 느슨하게 격리된 환경에서 애플리케이션을 패키징하고 실행할 수 있는 기능을 제공합니다. 격리 및 보안을 통해 주어진 호스트에서 많은 컨테이너를 동시에 실행할 수 있습니다. 컨테이너는 가볍고 애플리케이션을 실행하는 데 필요한 모든 것을 포함하므로 현재 호스트에 설치된 것에 의존할 필요가 없습니다. 작업하는 동안 컨테이너를 쉽게 공유할 수 있으며 공유하는 모든 사람이 동일한 방식으로 작동하는 동일한 컨테이너를 갖게 됩니다.
Docker는 컨테이너의 수명 주기를 관리하기 위한 도구와 플랫폼을 제공합니다.
- 컨테이너를 사용하여 애플리케이션 및 구성 요소를 개발
- 컨테이너는 애플리케이션을 배포하고 테스트하기 위한 단위
- 애플리케이션을 컨테이너 또는 오케스트레이션된 서비스로 프로덕션 환경에 배포합니다. 이는 프로덕션 환경이 데이터 센터, 클라우드 환경 또는 하이브리드 환경에서 동일하게 작동
도커는 어떻게 사용하나?
빠르고 일관된 애플리케이션 제공
Docker는 개발자가 애플리케이션 및 서비스를 제공하는 로컬 컨테이너를 사용하여 표준화된 환경에서 작업할 수 있도록 하여 개발주기를 간소화합니다. 컨테이너는 지속적 통합 및 지속적 전달(CI/CD) 워크플로우입니다.
<예제 시나리오>
- 개발자는 로컬에서 코드를 작성하고 Docker 컨테이너를 사용하여 동료와 작업 공유
- Docker를 사용하여 애플리케이션을 테스트 환경으로 구성하고 자동화 및 수동 테스트 실행
- 개발자는 버그를 발견하면 개발 환경에서 수정하고 테스트 및 검증을 위해 테스트 환경에 재배포
- 테스트가 완료되면 업데이트된 이미지를 프로덕션 환경에 배포하는 것으로 간단하게 고객에게 수정 사항을 제공
반응형 배포 및 확장
Docker의 컨테이너 기반 플랫폼은 이식성이 높은 워크로드를 허용합니다. Docker 컨테이너는 개발자의 랩톱, 데이터 센터의 물리적 또는 가상 머신, 클라우드 공급자 또는 hybrid 환경에서 실행할 수 있습니다.
Docker의 휴대성과 가벼운 특성 덕분에 거의 실시간으로 비즈니스 요구 사항에 따라 애플리케이션과 서비스를 확장하거나 축소하여 워크로드를 쉽게 동적으로 관리할 수 있습니다.
동일한 하드웨어에서 더 많은 워크로드 실행
Docker는 가볍고 빠릅니다. 하이퍼바이저 기반 가상 머신에 실행 가능하고 비용 효율적인 대안을 제공하므로 더 많은 컴퓨팅 용량을 사용하여 비즈니스 목표를 달성할 수 있습니다. Docker는 고밀도 환경과 더 적은 리소스로 더 많은 작업을 수행해야 하는 중소 배포에 적합합니다.
Docker는 클라이언트-서버 아키텍처를 사용합니다. Docker 클라이언트는 Docker 컨테이너를 빌드, 실행 및 배포 작업을 수행하는 Docker 데몬과 통신합니다. Docker 클라이언트와 데몬은 동일한 시스템에서 실행되거나 Docker 클라이언트를 원격 Docker 데몬에 연결할 수 있습니다. Docker 클라이언트와 데몬은 UNIX 소켓 또는 네트워크 인터페이스를 통해 REST API를 사용하여 통신합니다. 또 다른 Docker 클라이언트는 컨테이너 세트로 구성된 애플리케이션으로 작업할 수 있는 Docker Compose입니다.
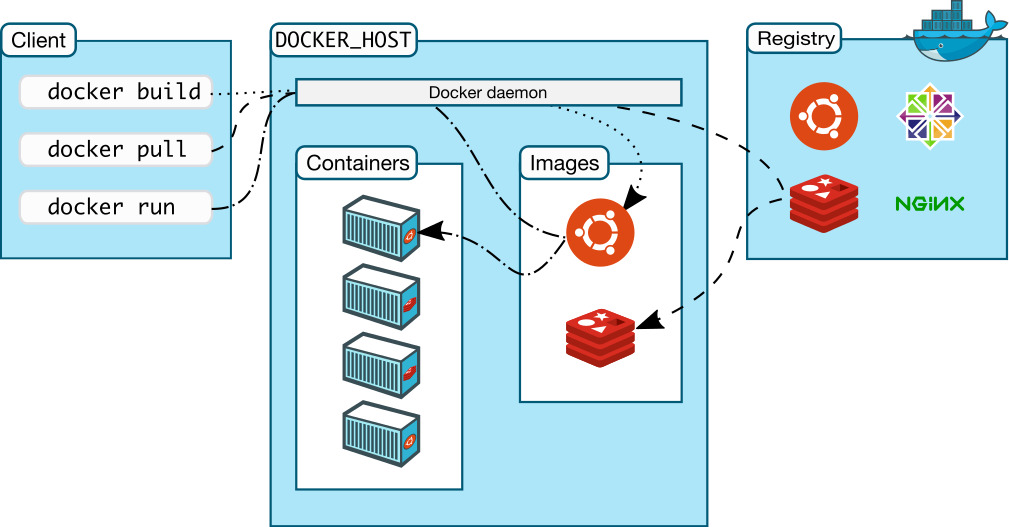
도커 데몬
Docker 데몬(dockerd)은 Docker API 요청을 수신하고 이미지, 컨테이너, 네트워크 및 볼륨과 같은 Docker 객체를 관리합니다.
데몬은 Docker 서비스를 관리하기 위해 다른 데몬과 통신할 수도 있습니다.
도커 클라이언트
Docker 클라이언트(docker)는 많은 Docker 사용자가 Docker와 상호 작용하는 기본 방법입니다.
docker run과 같은 명령을 사용할 때 클라이언트는 이러한 명령을 dockerd에 보내고 이를 수행합니다. docker 명령은 Docker API를 사용합니다. Docker 클라이언트는 둘 이상의 데몬과 통신할 수 있습니다.
도커 데스크탑
Docker Desktop은 컨테이너화된 애플리케이션 및 마이크로서비스를 구축하고 공유할 수 있는 Mac 또는 Windows 환경용으로 설치하기 쉬운 애플리케이션입니다.
Docker Desktop에는 Docker 데몬(dockerd), Docker 클라이언트(docker), Docker Compose, Docker Content Trust, Kubernetes 및 Credential Helper가 포함됩니다.
자세한 내용은 Docker 데스크톱(Docker Desktop)을 참조하세요.
도커 저장소
Docker 레지스트리는 Docker 이미지를 저장합니다. Docker Hub는 누구나 사용할 수 있는 공용 레지스트리이며 Docker는 기본적으로 Docker Hub에서 이미지를 찾도록 구성되어 있습니다. 자신의 개인 레지스트리를 실행할 수도 있습니다.
docker pull 또는 docker run 명령을 사용하면 구성된 레지스트리에서 필수 이미지를 가져옵니다. docker push 명령을 사용하면 이미지가 구성된 레지스트리로 저장됩니다
도커 오브젝트
Docker를 사용하면 이미지, 컨테이너, 네트워크, 볼륨, 플러그인 및 기타 개체를 만들고 사용합니다.
Images
이미지는 Docker 컨테이너 생성 지침이 포함된 읽기 전용 템플릿입니다. 이미지는 다른 이미지를 기반으로 추가 사용자 정의를 포함할 수 있습니다. 예를 들어, 우분투 이미지를 기반으로 하는 이미지를 빌드할 수 있고 Apache 웹 서버와 애플리케이션은 물론 애플리케이션을 실행하는 데 필요한 세부 구성정보도 설치합니다.
자신만의 이미지를 만들거나 다른 사람이 만들고 레지스트리에 게시한 이미지를 사용할 수 있습니다. 고유한 이미지를 빌드하려면 이미지를 만들고 실행하는 데 필요한 단계를 정의하기 위해 Dockerfile을 만듭니다. Dockerfile의 각 명령은 이미지에 계층을 생성합니다. Dockerfile을 변경하고 이미지를 다시 빌드하면 변경된 레이어만 다시 빌드됩니다. 이것은 다른 가상화 기술과 비교할 때 이미지를 매우 가볍고 작고 빠르게 만드는 부분입니다.
Containers
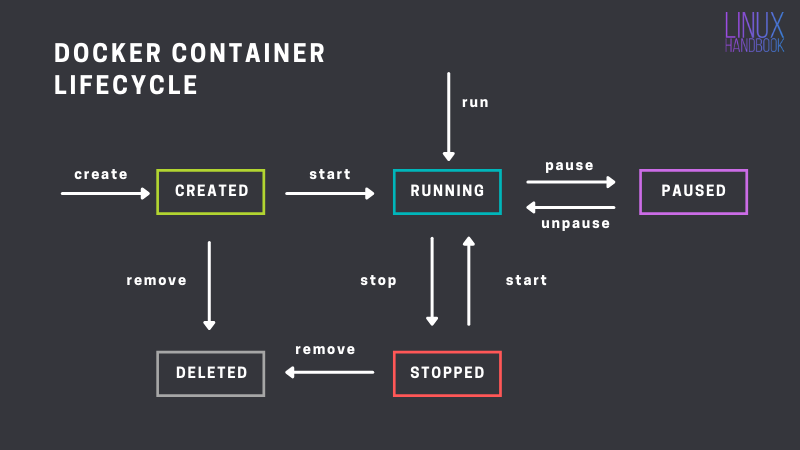
컨테이너는 이미지의 실행 가능한 인스턴스입니다. Docker API 또는 CLI를 사용하여 컨테이너를 생성, 시작, 중지, 이동 또는 삭제할 수 있습니다. 컨테이너를 하나 이상의 네트워크에 연결하거나, 컨테이너에 스토리지를 연결하거나, 현재 상태를 기반으로 새 이미지를 생성할 수도 있습니다.
기본적으로 컨테이너는 다른 컨테이너 및 해당 호스트 시스템과 잘 격리되어 있습니다. 컨테이너의 네트워크, 스토리지 또는 기타 하위 시스템이 다른 컨테이너나 호스트 시스템과의 격리를 제어할 수 있습니다.
컨테이너는 이미지와 컨테이너를 만들거나 시작할 때 제공하는 구성 옵션으로 정의됩니다. 컨테이너가 제거되면 영구 저장소에 저장되지 않은 상태 변경 사항은 사라집니다.
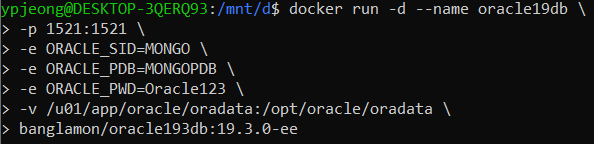
<도커 실행 명령의 예>
다음 명령은 우분투 컨테이너를 실행하고 로컬 명령줄 세션에 대화형으로 연결하고 /bin/bash를 실행합니다.
$ docker run -i -t ubuntu /bin/bash
이 명령을 실행하면 다음이 발생합니다.(기본 레지스트리 구성을 사용한다고 가정)
- 우분투 이미지가 로컬에 없는 경우 Docker는 수동으로 docker pull ubuntu를 실행한 것처럼 구성된 레지스트리에서 이미지를 가져옵니다.
- Docker는 docker container create 명령을 수동으로 실행한 것처럼 새 컨테이너를 생성합니다.
- Docker는 컨테이너에 읽기-쓰기 파일 시스템을 최종 계층으로 할당합니다. 이를 통해 실행 중인 컨테이너가 로컬 파일 시스템에서 파일 및 디렉토리를 생성하거나 수정할 수 있습니다.
- Docker는 네트워킹 옵션을 지정하지 않았기 때문에 컨테이너를 기본 네트워크에 연결하는 네트워크 인터페이스를 만듭니다. 여기에는 컨테이너에 IP 주소 할당이 포함됩니다. 기본적으로 컨테이너는 호스트 시스템의 네트워크 연결을 사용하여 외부 네트워크에 연결할 수 있습니다.
- Docker는 컨테이너를 시작하고 /bin/bash를 실행합니다. 컨테이너가 대화식으로 실행되고 터미널에 연결되기 때문에(-i 및 -t 플래그로 인해) 출력이 터미널에 기록되는 동안 키보드를 사용하여 입력을 제공할 수 있습니다.
/bin/bash 명령을 종료하기 위해 exit를 입력하면 컨테이너가 중지되지만 제거되지는 않습니다. 다시 시작하거나 제거할 수 있습니다.
container lifecycle
The underlying technology
Docker는 Go 프로그래밍 언어로 작성되었으며 Linux 커널의 여러 기능을 활용하여 기능을 제공합니다. Docker는 네임스페이스라는 기술을 사용하여 컨테이너라는 격리된 작업 공간을 제공합니다. 컨테이너를 실행할 때 Docker는 해당 컨테이너에 대한 네임스페이스 세트를 생성합니다.
이러한 네임스페이스는 격리 계층을 제공합니다. 컨테이너의 각 측면은 별도의 네임스페이스에서 실행되며 액세스는 해당 네임스페이스로 제한됩니다.
다음 단계
- 도커 설치하기(installing Docker)
- 도커 시작하기(Getting started with Docker)
'Docker' 카테고리의 다른 글
| 헷갈리는 Docker - 수정 (0) | 2021.12.26 |
|---|---|
| Docker Commands for Managing Container Lifecycle (0) | 2021.12.25 |
| Docker run, start, create 차이 (0) | 2021.12.25 |
| window10에 도커 설치하기 (1) | 2021.12.25 |
| 도커 명령어 - 수정 (0) | 2021.12.25 |