Unable to correct problems, you have held broken packages MYSQL 오류 메시지
당황스럽군.
$ sudo apt-get install mysql-server

Reading package lists... Done
Building dependency tree
Reading state information... Done
Some packages could not be installed. This may mean that you have
requested an impossible situation or if you are using the unstable
distribution that some required packages have not yet been created
or been moved out of Incoming.
The following information may help to resolve the situation:

The following packages have unmet dependencies:
 mysql-server : Depends: mysql-server-8.0 but it is not going to be installed
E: Unable to correct problems, you have held broken packages.
해결책
aptitude 를 설치한 후에 다시 mysql-server를 설치합니다.
- sudo apt-get install aptitude
- sudo aptitude install mysql-server
$ sudo apt-get install aptitude

Reading package lists... Done
Building dependency tree
Reading state information... Done
The following additional packages will be installed:
  aptitude-common libboost-iostreams1.71.0 libclass-accessor-perl libcwidget4 libio-string-perl
  libparse-debianchangelog-perl libsigc++-2.0-0v5 libsub-name-perl libxapian30
Suggested packages:
  aptitude-doc-en | aptitude-doc apt-xapian-index debtags tasksel libcwidget-dev libxml-simple-perl xapian-tools
The following NEW packages will be installed:
  aptitude aptitude-common libboost-iostreams1.71.0 libclass-accessor-perl libcwidget4 libio-string-perl
  libparse-debianchangelog-perl libsigc++-2.0-0v5 libsub-name-perl libxapian30
0 upgraded, 10 newly installed, 0 to remove and 0 not upgraded.
Need to get 4343 kB of archives.

$ sudo apt-get install mysql-server
윈도우 command 창이나 Window PowerShell 창에서 wsl 명령어를 수행하여 wsl에 접속한다. wsl에 접속한다는 것은 wsl 이 기동하는 Ubuntu Linux에 접속하는 것이다. 문서에서 "$" 표시는 wsl 접속된 상태를 의미한다.
PS D:\> wsl
username@computername:/mnt/d$
mariadb-server 설치: DBMS 서버 설치
아래 명령어로 mariaDB server(DBMS)를 설치한다. 위에서 확인한 mariadb-server-10.3 버전을 설치한다.
mariadb-client-10.3, mariadb-client-core-10.3, mariadb-common mariadb-server-core-10.3, socat 도 같이 설치되므로 별도로 client를 설치할 필요는 없다.
mariadb-server 설치후 sudo apt-get install mariadb-client-10.3 명령어를 수행하면 이미 설치되었다는 메시지가 출력된다.
$ sudo apt-get install mariadb-server

Reading package lists... Done
Building dependency tree
Reading state information... Done
The following packages were automatically installed and are no longer required:
  libevent-core-2.1-7 libevent-pthreads-2.1-7 libmecab2 mecab-ipadic mecab-ipadic-utf8 mecab-utils
Use 'sudo apt autoremove' to remove them.
The following additional packages will be installed:
  galera-3 libconfig-inifiles-perl libdbd-mysql-perl libdbi-perl libmysqlclient21 libsnappy1v5 libterm-readkey-perl
  mariadb-client-10.3 mariadb-client-core-10.3 mariadb-common mariadb-server-core-10.3 socat
Suggested packages:
  libclone-perl libmldbm-perl libnet-daemon-perl libsql-statement-perl mailx mariadb-test tinyca
The following NEW packages will be installed:
  galera-3 libconfig-inifiles-perl libdbd-mysql-perl libdbi-perl libmysqlclient21 libsnappy1v5 libterm-readkey-perl
  mariadb-client-10.3 mariadb-client-core-10.3 mariadb-common mariadb-server-10.3 mariadb-server-core-10.3 socat
0 upgraded, 13 newly installed, 5 to remove and 0 not upgraded.
Need to get 20.6 MB of archives.
After this operation, 32.6 MB disk space will be freed.
Do you want to continue? [Y/n]
위의 명령어에 sudo 명령어를 붙인 이유는 root 권한으로 설치해야 한다. 그렇지 않으면 아래 오류가 발생한다.
$ apt-get install mariadb-server
E: Could not open lock file /var/lib/dpkg/lock-frontend - open (13: Permission denied)
E: Unable to acquire the dpkg frontend lock (/var/lib/dpkg/lock-frontend), are you root?
설치가 완료된 후 MariaDB 서비스가 자동으로 시작되지 않으므로 다음 명령을 사용하여 MariaDB 서비스를 시작합니다.
$ sudo service mysql start
 * Starting MariaDB database server mysqld
mysql_secure_installation: 보안 설정
mysql_secure_installation 명령어로 root 패스워드 설정, anonymous user 삭제 여부, root 원격접속허용 여부, 테스트 데이터베이스 삭제 여부, 테이블 권한 갱신 여부 등을 선택하는 작업을 수행한다.
$ sudo mysql_secure_installation

NOTE: RUNNING ALL PARTS OF THIS SCRIPT IS RECOMMENDED FOR ALL MariaDB
      SERVERS IN PRODUCTION USE!  PLEASE READ EACH STEP CAREFULLY!

In order to log into MariaDB to secure it, we'll need the current
password for the root user.  If you've just installed MariaDB, and
you haven't set the root password yet, the password will be blank,
so you should just press enter here.
Set root password? [Y/n] Y
New password:
Enter current password for root (enter for none):

... ...
Remove anonymous users? [Y/n]
Disallow root login remotely? [Y/n]
Remove test database and access to it? [Y/n]
Reload privilege tables now? [Y/n]
최초 설치 시 루트 암호 빈값이므로 " Enter "를 누릅니다.
root에 대한 새로운 암호설정 여부에서 'Y'를 입력 후 암호를 설정합니다.
mariadb 접속 및 SQL 수행
MariaDB가 정상 동작하는지 확인하기 위해서 wsl 터미널에서 mariadb를 실행하고 MariaDB console에서 명령어를 입력합니다. MariaDB에서 SQL 명령어 끝에 세미콜론(;)을 입력하고 엔터를 치면 실행 결과를 출력합니다.
wsl 콘솔에서 아래 명령어를 수행하면 wsl 계정의 패승워드를 입력하라는 메시지가 뜨는데, wsl 생성 시 입력한 패스워드를 입력합니다. 패스워드를 입력하면 바로 mariadb에 접속됩니다. 패스워드를 묻지 않고 바로 접속될 수도 있습니다.
$ sudo mariadb
[sudo] password for username :

Welcome to the MariaDB monitor.  Commands end with ; or \g.
Your MariaDB connection id is 66
Server version: 10.3.32-MariaDB-0ubuntu0.20.04.1 Ubuntu 20.04

Copyright (c) 2000, 2018, Oracle, MariaDB Corporation Ab and others.

Type 'help;' or '\h' for help. Type '\c' to clear the current input statement.
Maria DB 에서 SQL 명령어를 실행한다.
현재 생성되어 있는 database 목록을 출력한다
MariaDB [(none)]> show databases;
+--------------------+
| Database           |
+--------------------+
| information_schema |
| mysql              |
| performance_schema |
+--------------------+
설치된 Maria DB 버전을 확인한다. 10.3 version이 설치된 것을 확인 할 수 있다.
MariaDB [(none)]> select version();
+----------------------------------+
| version()                        |
+----------------------------------+
| 10.3.32-MariaDB-0ubuntu0.20.04.1 |
+----------------------------------+
1 row in set (0.000 sec)
계정 정보에 대해 조회해 봅니다. 위에서 계정과 패스워드없이 DB에 접속한 한 것은 root 인증 방식이 unix_socket 방식으로 설정되어 있어 패스워드 없이 접속된 것입니다.
MariaDB [mysql]> select host,user,plugin from user;
+-----------+------+-------------+
| host      | user | plugin      |
+-----------+------+-------------+
| localhost | root | unix_socket |
+-----------+------+-------------+
1 row in set (0.000 sec)
WSL 쉘에서 다음 접속 명령어를 수행하면 접속 오류가 발생합니다. 이는 인증 방식이 unix_sokcet 방식으로 지정되어 있기 때문입니다.
$ mysql -u root -p
Enter password:
ERROR 1698 (28000): Access denied for user 'root'@'localhost'
root로 mysql password 방식으로 변경하려면 다음을 수행합니다.
sudo mysql

MariaDB> update mysql.user set plugin = 'mysql_native_password' where User='root';
MariaDB> FLUSH PRIVILEGES;

MariaDB [(none)]> select host,user,plugin from mysql.user;
+-----------+------+-----------------------+
| host      | user | plugin                |
+-----------+------+-----------------------+
| localhost | root | mysql_native_password |
+-----------+------+-----------------------+
1 row in set (0.000 sec)

MariaDB> exit;
인증 방식이 기존 unix_sokcet 방식에서 mysql_native_password 방식으로 변경된 것을 확인할 수 있습니다.
이제 쉘에서 아래처럼 db 접속 명령어를 수행하면 DB 접속이 잘 됩니다.
$ mysql -u root -p
Enter password:
Welcome to the MariaDB monitor.  Commands end with ; or \g.
Your MariaDB connection id is 59
Server version: 10.3.32-MariaDB-0ubuntu0.20.04.1 Ubuntu 20.04

Copyright (c) 2000, 2018, Oracle, MariaDB Corporation Ab and others.

Type 'help;' or '\h' for help. Type '\c' to clear the current input statement.

MariaDB [(none)]>
mariadb 관리툴로 접속
mysql, mariaDB 관리 툴로는 HeidiSQL, DBever, Toad for mysql, SQL Developer, MySQL Workbench 등 다양하게 존재합니다. 이중 HeidiSQL 로 mariaDB 접속을 설명합니다.
아래 명령은 패키지 및 관련 구성 파일을 완전히 제거합니다. ~(home directory를 나타냄) 에 있는 구성 파일은 일반적으로 이 명령의 영향을 받지 않습니다
apt-get purge <package_name>
아래 명령은 다른 패키지에 의해 설치되어 더 이상 필요하지 않은 패키지를 제거합니다.
apt-get autoremove
이 명령은 설치된 패키지와 종속성을 제거합니다.
apt-get autoremove <package_name>
While there is no built in way to remove all of your configuration information from your removed packages you can remove all configuration data from every removed package with the following command.
제거된 패키지에서 모든 구성 정보를 제거하는 내장된 방법은 없지만 다음 명령을 사용하여 제거된 모든 패키지에서 모든 구성 데이터를 제거할 수 있습니다.
apt purge명령어는 패키지를 제거하면 구성 파일과 함께 패키지를 삭제합니다. apt remove 명령은 패키지만 제거하지만 구성 파일은 그대로 유지됩니다.
명령어를 실행하면 최신버전이나 다른 버전을 설치하기 위해서라면 데이터를 보관하라는 메지시지가 나타납니다. 데이터가 존재하고 보관해야 한다면, 별도 백업을 받고 삭제합니다. 화살표 키를 움직여 <Yes>선택하고 엔터키를 칩니다.
그 후 autoremove 명령어를 통해 패키지의 의존성 때문에 설치된 패키지들을 제거해 줍니다. mariadb와 관련되어 설치된 패키지들이 제거됩니다.
$ sudo apt autoremove

The following packages will be REMOVED:
  galera-3 libcgi-fast-perl libcgi-pm-perl libconfig-inifiles-perl libdbd-mysql-perl libdbi-perl libencode-locale-perl
  libfcgi-perl libhtml-parser-perl libhtml-tagset-perl libhtml-template-perl libhttp-date-perl libhttp-message-perl
  libio-html-perl liblwp-mediatypes-perl libmysqlclient21 libsnappy1v5 libterm-readkey-perl libtimedate-perl
  liburi-perl mysql-common socat
0 upgraded, 0 newly installed, 22 to remove and 0 not upgraded.
After this operation, 16.2 MB disk space will be freed.
mysql 관련 config 파일이 남아 있으니, dpkg 명령어를 사용하여 제거해 줍니다.
dpkg -l | grep mysql

rc  mysql-common                   5.8+1.0.5ubuntu2                      all          MySQL database common files, e.g. /etc/mysql/my.cnf
dpkg 예시화면
위처럼 mysql-common 이 보이면
sudo apt purge mysql-common
명령어를 통해 제거해줍니다.
그 후 꼭 REBOOT을 해줍니다.
sudo reboot
MariaDB 재설치
sudo apt install mariadb-server --fix-missing --fix-broken

<!--  --fix-missing --fix-broken를 사용하여 fetch to fail 에러를 대비합니다. -->
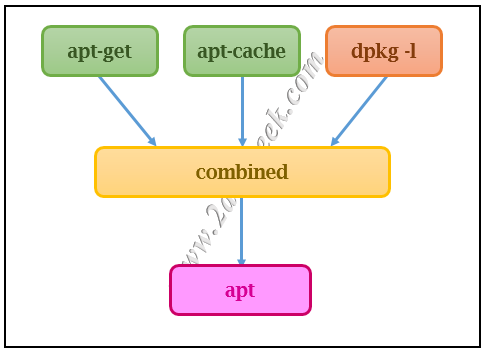
APT(Advanced Package Tool)는 데비안의 패키징 시스템을 관리하는 도구 모음입니다. "libapt-pkg" 및 "libapt-inst"와 같은 핵심 라이브러리와 함께 작동하여 Debian, Ubuntu 패키지 관리 프로세스를 단순화합니다. apt, apt-get, apt-cache, apt-config 및 aptitude(GUI)와 같은 명령줄 도구는 APT와 상호 작용하여 설치, 업데이트 및 삭제와 같은 다양한 패키지 기능을 수행합니다
apt 명령어
apt는 Ubuntu, Debian 및 파생 제품에서 deb 패키지를 설치, 업데이트 및 제거하기 위한 명령줄 유틸리티입니다. apt-get 및 apt-cache에서 가장 일반적으로 사용되는 명령을 합쳤습니다.
apt명령은 최종 사용자에게 적합하며 apt-get 명령의 일부 기능을 포함하지 않습니다. apt는 apt-get의 결함 중 일부를 수정하여 설계되었습니다.
apt-get 명령어란?
apt-get은 데비안 기반 시스템에서 널리 사용되는 CLI 패키지 관리 도구입니다. apt-get 명령을 사용하면 패키지를 설치, 업데이트 및 제거를 할 수 있으며 apt-cache 명령은 새 패키지를 검색하는 데 사용됩니다. apt-get은 하위 호환성이 있는 APT 패키지 시스템을 위한 저수준 프론트 엔드 도구입니다.
apt-get 명령어의 불편한 점은?
패키지 관리를 위해 여러 다른 apt-get 명령어가 사용됩니다. 이것이 apt-get의 비효율성과 기능 부족 때문입니다.
apt-get – 패키지 설치, 업데이트 및 제거
apt-cache – 패키지 조회
dpkg – 시스템에 설치된 패키지 조회
apt 명령은 이러한 모든 기능을 단일 명령으로 결합하여 APT 패키지 관리자와의 상호 작용을 용이하게 합니다.
apt 와 apt-get 차이점은?
apt는 보기좋은 진행률 표시
apt는 업그레이드해야 하는 패키지 목록 나열
apt는 apt-get, apt-cache 및 dpkg -l의 기능 결합
apt 및 apt-get 명령의 구문 비교
새로운 명령어
1) 진행률바
apt 명령으로 패키지를 설치하거나 제거할 때 진행률 표시줄이 표시됩니다. 현재 프로세스의 진행을 백분율로 보여줍니다.
$ apt install mariadb-server
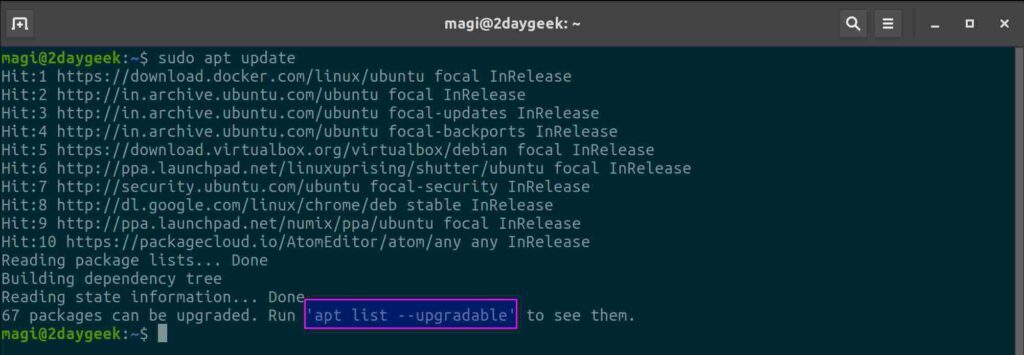
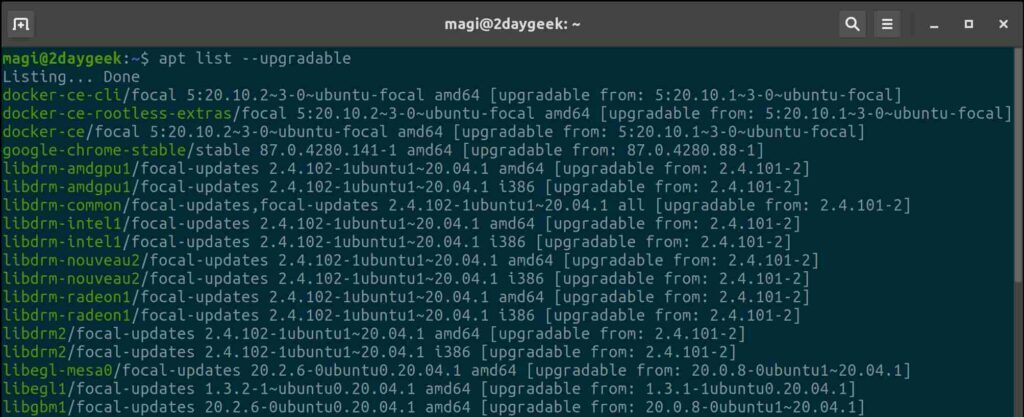
2) 업그레이드해야 하는 패키지 목록 표시
아래 출력은 리포지토리 데이터베이스를 업데이트하는 동안 업그레이드할 수 있는 패키지 수를 보여줍니다.
udpate할 것이 없으면 "All packages are up to date" 라는 메시지를 보여줍니다.
패키지 목록 및 기타 정보는 아래에 언급된 대로 apt list --upgradable 명령을 실행하여 볼 수 있습니다.
3) apt는 apt-get, apt-cache 및 dpkg -l의 기능 결합
Ubuntu 16.04 이전에는 사용자가 일반적으로 apt-get 및 apt-cache를 통해 패키지 작업을 했습니다. apt 명령어가 apt-get & apt-cache의 기능과 필수 명령어를 통합했기 때문에 apt를 사용하는 것이 효율적입니다.
아래는 서버에 설치된 maraidb 관련 패키지 목록을 조회하는 명령어입니다. apt-get으로는 할 수 없고 dpkg 명령어를 수행해야 합니다. 그러나 apt 명령어는 설치된 패키지 목록 조회가 가능합니다.
$ dpkg -l | grep mariadb
ii  mariadb-client-10.3                        1:10.3.32-0ubuntu0.20.04.1            amd64        MariaDB database client binaries
ii  mariadb-client-core-10.3                   1:10.3.32-0ubuntu0.20.04.1            amd64        MariaDB database core client binaries
ii  mariadb-common                             1:10.3.32-0ubuntu0.20.04.1            all          MariaDB common metapackage
ii  mariadb-server                             1:10.3.32-0ubuntu0.20.04.1            all          MariaDB database server (metapackage depending on the latest version)
ii  mariadb-server-10.3                        1:10.3.32-0ubuntu0.20.04.1            amd64        MariaDB database server binaries
ii  mariadb-server-core-10.3                   1:10.3.32-0ubuntu0.20.04.1            amd64        MariaDB database core server files

$ apt list --installed | grep mariadb
mariadb-client-10.3/focal-updates,focal-security,now 1:10.3.32-0ubuntu0.20.04.1 amd64 [installed,automatic]
mariadb-client-core-10.3/focal-updates,focal-security,now 1:10.3.32-0ubuntu0.20.04.1 amd64 [installed,automatic]
mariadb-common/focal-updates,focal-security,now 1:10.3.32-0ubuntu0.20.04.1 all [installed,automatic]
mariadb-server-10.3/focal-updates,focal-security,now 1:10.3.32-0ubuntu0.20.04.1 amd64 [installed,automatic]
mariadb-server-core-10.3/focal-updates,focal-security,now 1:10.3.32-0ubuntu0.20.04.1 amd64 [installed,automatic]
mariadb-server/focal-updates,focal-security,now 1:10.3.32-0ubuntu0.20.04.1 all [installed]
4) apt 및 apt-get 명령의 구문 비교
apt 명령은 일반적으로 사용되는 apt-get 및 apt-cache 기능을 결합하지만 apt-get과 하위 호환되지는 않습니다. 따라서 apt-get 명령을 항상 apt로 바꿀 수는 없습니다.
apt, apt-get 명령 비교
apt 명령어
apt-get, apt-cache, dkpg 명령어
설명
apt update
apt-get update
Refreshes repository index
apt install [package]
apt-get install [package]
Install a package
apt upgrade
apt-get upgrade
Upgrade available package updates
apt remove [package]
apt-get remove[package]
Remove a package
apt purge [package]
apt-get purge [package]
Remove a package with configuration
apt autoremove
apt-get autoremove
Remove unnecessary dependencies
apt full-upgrade
apt-get dist-upgrade
Update all packages and remove unnecessary dependencies
SQLite는 관계형 데이터베이스 관리 시스템을 제공하는 소프트웨어 라이브러리입니다. SQLite의 라이트는 설정, 데이터베이스 관리 및 리소스 측면에서 가볍습니다.
SQLite에는 다음과 같은 기능이 있습니다.
서버리스, 독립실행형,Zero-configuration, 트랜잭션 처리
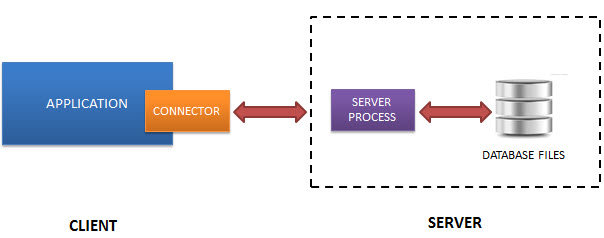
Serverless
일반적으로 MySQL, PostgreSQL 등의 RDBMS는 별도의 서버 프로세스가 필요합니다. 데이터베이스 서버에 액세스하려는 응용 프로그램은 TCP/IP 프로토콜을 사용하여 요청을 보내고 받습니다. 이것을 클라이언트/서버 아키텍처라고 합니다. 다음 다이어그램은 RDBMS 클라이언트/서버 아키텍처를 보여줍니다.
SQLite는 위와 같은 방식으로 작동하지 않습니다. SQLite는 서버 프로세스를 실행할 필요가 없습니다. SQLite 데이터베이스는 데이터베이스에 액세스하는 애플리케이션과 통합됩니다. 응용 프로그램은 SQLite 데이터베이스와 상호 작용하여 디스크에 저장된 데이터베이스 파일에서 직접 읽고 씁니다.
다음 다이어그램은 SQLite 서버리스 아키텍처를 보여줍니다
독립실행형
SQLite는 독립 실행형으로 운영 체제나 외부 라이브러리의 지원이 최소한으로 필요합니다. 따라서 iPhone, Android 전화, 게임 콘솔, 휴대용 미디어 플레이어 등과 같은 임베디드 장치의 모든 환경에서 SQLite를 사용할 수 있습니다. SQLite는 ANSI-C를 사용하여 개발되었습니다. 소스 코드는 sqlite3.c 및 헤더 파일 sqlite3.h로 사용할 수 있습니다. SQLite를 사용하는 애플리케이션을 개발하려면 이 파일을 프로젝트에 포함하고 컴파일하면 됩니다.
Zero-configuration
서버리스 아키텍처로 인해 SQLite를 "설치"할 필요가 없습니다. 구성, 시작 및 중지해야 하는 서버 프로세스가 없습니다. 또한 SQLite는 구성 파일을 사용하지 않습니다.
트랜잭션 처리
SQLite의 모든 트랜잭션은 완전히 ACID를 준수합니다. 이는 모든 쿼리 및 변경 사항이 Atomic, Consistent, Isolated 및 Durable임을 의미합니다. 즉, 응용 프로그램 충돌, 정전 또는 운영 체제 충돌과 같은 예기치 않은 상황이 발생하더라도 트랜잭션 내의 모든 변경은 완전히 처리되거나 전혀 처리되지(commit or rollback) 않습니다.
SQLite 특징
SQLite는 테이블에 동적 유형을 사용합니다. 데이터 유형에 관계없이 모든 열에 모든 값을 저장할 수 있음을 의미합니다. SQLite를 사용하면 단일 데이터베이스에 연결하여 여러 데이터베이스 파일에 동시에 액세스할 수 있습니다. 이것은 다른 데이터베이스의 테이블을 조인하거나 단일 명령으로 데이터베이스 간에 데이터를 복사할 수 있습니다. SQLite는 작업 속도가 매우 빠른 인메모리 데이터베이스를 생성할 수 있습니다.
SQLite 소스 코드는 공개되어 있으며 모든 사람이 어떤 목적으로든 무료로 사용할 수 있습니다.
MariaDB Community Server는 전 세계 개발자들에게 사랑받는 오픈 소스 관계형 데이터베이스입니다. MySQL, Oracle 및 기타 SQL 데이터베이스와 호환되며 영원히 오픈 소스로 유지됩니다. 주요 기능에는 최신 SQL, 플러그형 스토리지 엔진, 분석 및 고가용성을 위한 컬럼 스토리지가 포함됩니다
Modern relational database
Compatible with MySQL
Massive ecosystem of tools and libraries
Open source/Community-supported
MariaDB Enterprise
MariaDB Enterprise는 트랜잭션, 분석 또는 하이브리드 트랜잭션/분석 워크로드는 물론 관계형 또는 문서 데이터를 처리할 수 있는 다용성과 독립 실행형 데이터베이스 및 열 형식 데이터 웨어하우스에서 초당 수백만 건의 트랜잭션을 실행하고 수십억 개의 행에 대해 대화형 임시 분석을 수행하는 분산 SQL 데이터베이스.
MariaDB Enterprise Server – Hardened version of MariaDB Community Server
MaxScale database proxy
ColumnStore MPP analytics
MariaDB Xpand distributed SQL engine
Backports, patches and CVEs
Consultative support
MariaDB SkySQL
SkySQL은 트랜잭션, 분석 및 하이브리드 워크로드에 대한 지원을 포함하여 MariaDB Enterprise의 모든 기능을 클라우드에 제공하는 서비스형 데이터베이스(DBaaS)입니다. Kubernetes를 기반으로 구축되고 클라우드 인프라 및 서비스에 최적화된 SkySQL은 사용 용이성과 셀프 서비스를 엔터프라이즈 안정성 및 지원을 제공합니다.
DataBase-As-A-Service (DBaaS) for systems of record
Multi-cloud – Deploy on AWS and GCP
Scale on demand – Scale out and back with your workload
Support from the source – 24x7x365 help when you need it
SkyDBAs – Database administrators to complement your team
Even if you have no prior programming experience, you should be able to get a good start with this Python introduction. We’ll take it slow, but before you know it, you’ll have a solid base-level knowledge about:
이제 이 Python 소개를 통해 기본 학습을 시작할 준비가 되었습니다. 시스템에 Python이 설치되어 있는지 확인하거나 Python의 온라인 버전을 사용하십시오.
프로그래밍 경험이 없더라도 이 Python 입문서로 좋은 시작을 할 수 있을 것입니다. 우리는 천천히 할 것이지만 당신이 그것을 알기 전에 다음에 대한 확실한 기본 수준 지식을 갖게 될 것입니다.
This introduction to Python will not dive into these subjects’ nitty-gritty details but instead touch the surface and introduce you to the basic concepts.
Further on in the tutorial, we’ll take some deep dives into specific subjects:
If you get stuck, do not hesitate tocontact uswith any questions you might have. Sometimes writing down the question is enough to answer it yourself, but I’m happy to help where I can. Let’s go!
Podman은 Windows10 WSL2 Ubuntu 20.04에 설치하거나 Windows10 WSL2 에 Ubuntu 20.10 이상에서 설치할 수 있습니다.
Windows 10 WSL2 에 Ubuntu 20.10 이상인 경우에는 설치 방법이 간단합니다.
단, 현재까지는 Window10에 Unbuntu 20.10을 직접 설치할 수 없어, Ubuntu 20.04를 20.10 이상으로 Upgrade해야 합니다.
Windows 10 WSL 2 Ubuntu 20.04에 Podman 설치
Windows 10 WSL 2 에 Ubuntu 20.04가 설치되어 있지 않다면
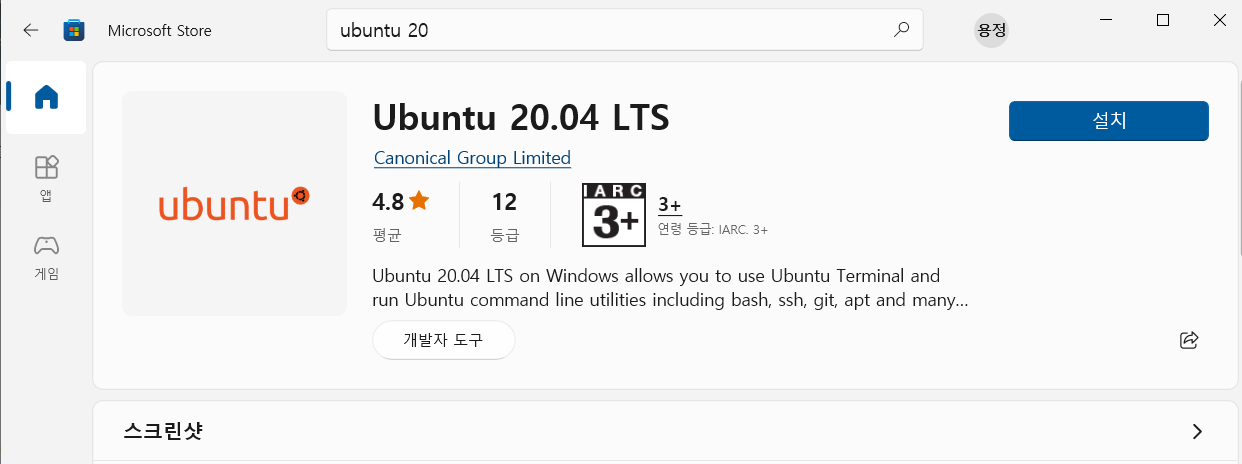
Microsoft Store 또는 Powershell을 사용하여 Ubuntu 20.04 LTS Linux 앱을 설치합니다. CLI와 GUI의 두 가지 방법이 있습니다.
1. Window10에 Ubuntu 20.04 설치
1) Command-line 설치
다음 명령어로 사용 가능한 다른 Linux 배포판을 확인합니다.
wsl --list --online
명령줄을 사용하려면 Windows 시작 메뉴에서 Powershell(관리자) 또는 Windows 터미널(관리자)을 선택합니다.
wsl --install -d Ubuntu-20.04
2) GUI 로 설치
Microsoft Store 에서 Ubuntu 20.04 LTS 를 검색한 후 [설치] 버튼을 클릭하여 설치합니다.
2. Ubuntu 20.04가 설치된 WSL2 실행
명령창, Powershell, Window Terminal 중 평소 본인이 사용하는 명령창을 관리자모드로 실행합니다. 설치된 Ubuntu 에 wsl 명령어를 입력하여 접속합니다. 최초 접속하는 경우에는 설정을 완료하는 데 시간이 걸리며 그 후에 사용자 이름과 비밀번호를 설정하라는 메시지가 표시됩니다.
한번 만들면 해당 계정이 배포의 기본 사용자가 되며 시작 시 자동으로 로그인됩니다.
이 계정은 sudo(Super User Do) 명령을 실행할 수 있는 Linux 관리자입니다.
최초 설정이 완료되면 먼저 업데이트 명령을 실행합니다.
$ sudo apt update
3. Podman 설치
저장소를 사용하여 Ubuntu 20.04 LTS에서 Podman을 가져옵니다
repository 추가
echo "deb https://download.opensuse.org/repositories/devel:/kubic:/libcontainers:/stable/xUbuntu_20.04/ /" |
sudo tee /etc/apt/sources.list.d/devel:kubic:libcontainers:stable.list
Podman에서 사용하는 명령줄은 기본적으로 Docker와 동일하고 추가된 기능이 있습니다.
podman pull 명령어로 Ubuntu 이미지를 내려받습니다.
$ podman pull ubuntu
Resolved "ubuntu" as an alias (/etc/containers/registries.conf.d/000-shortnames.conf)
Trying to pull docker.io/library/ubuntu:latest...
Getting image source signatures
Copying blob 7b1a6ab2e44d done
Copying config ba6acccedd done
Writing manifest to image destination
Storing signatures
ba6acccedd2923aee4c2acc6a23780b14ed4b8a5fa4e14e252a23b846df9b6c1
podman pull 명령어로 Fedora 이미지를 내려받습니다.
$ podman pull fedora

Resolved "fedora" as an alias (/etc/containers/registries.conf.d/000-shortnames.conf)
Trying to pull registry.fedoraproject.org/fedora:latest...
Getting image source signatures
Copying blob 4545346f2a49 done
Copying config 3059bef432 done
Writing manifest to image destination
Storing signatures
3059bef432ebb91a6a51d8f5cf20b033041dbddb3cab79628c1eb3412cbde0ae
podman images 명령어로 내려받은 이미지를 조회합니다.
$ podman images

REPOSITORY                         TAG         IMAGE ID      CREATED       SIZE
registry.fedoraproject.org/fedora  latest      3059bef432eb  4 weeks ago   159 MB
docker.io/library/ubuntu           latest      ba6acccedd29  2 months ago  75.2 MB
Note: 이미지를 가져오는 동안 경고가 표시되는 경우 접근권한의 문제이므로 아래 명령어를 수행합니다.
: WARN[0000] "/"는 공유 마운트가 아닌 경우 루트가 없는 컨테이너에 문제가 발생하거나 마운트가 누락될 수 있습니다.
- i, --interactive : true로 설정하면 연결되지 않은 경우에도 stdin을 열어 둡니다. 기본값은 false입니다.
- t, --tty : TTY를 할당합니다. 기본값은 false입니다
--name <container_name> : 컨테이너 이름을 지정합니다.
위 명령어는 다운로드한 fedora 이미지로 fe_cont 라는 컨테이너를 생성하고 stdin과 tty 로 리눅스 콘솔을 할당하고 백그라운드로 실행하라는 명령어입니다.
$ podman ps
CONTAINER ID  IMAGE                                     COMMAND     CREATED         STATUS             PORTS       NAMES
7933f20a3a8b  registry.fedoraproject.org/fedora:latest  /bin/bash   14 minutes ago  Up 14 minutes ago              fe_cont
podman attach 로 실행중인 컨테이너에 접속합니다. fe_cont 컨테이너에 접속 한 후 /etc/os-release 로 조회해 봅니다.